DIY Lift Top Coffee Table: Add Functionality and Style to Your Living Space
### Introduction
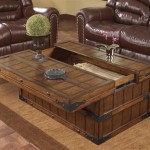
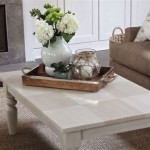
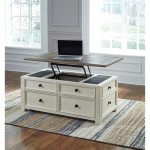
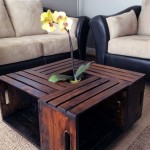
A lift-top coffee table is a versatile and stylish addition to any living room. It offers both functionality and convenience, allowing you to work, eat, or entertain guests comfortably without leaving the comfort of your couch. Building your own lift-top coffee table is a great DIY project that can save you money and add a personal touch to your home. Here's a detailed guide to help you create your own lift-top coffee table:
### Materials and Tools:
1. Wood:
Choose sturdy wood such as pine, oak, or maple for the table's base and top. You'll need enough wood to cut the pieces according to the desired dimensions of your table. 2.Plywood:
Purchase a sheet of plywood for the interior of the lift-top mechanism. 3.Hardware:
Get hinges, screws, nails, and handles for the lift-top mechanism and table assembly. 4.Finishing Supplies:
Sandpaper, wood stain or paint, and a protective sealant are required for finishing the table. 5.Tools:
Gather essential tools such as a saw, drill, hammer, measuring tape, and safety gear (goggles, gloves). ### Step-by-Step Guide: #### 1. Cut the Wood Pieces: - Calculate the dimensions of the table's base and top based on your desired size and shape. - Use a saw to cut the wood pieces according to your measurements. #### 2. Assemble the Table Base: - Arrange the wood pieces to form the table's base. - Join the pieces using screws or nails, ensuring a sturdy structure. #### 3. Build the Interior Frame: - Cut plywood pieces for the interior frame that will support the lift-top mechanism. - Assemble the interior frame using screws or nails, ensuring it fits snugly inside the table base. #### 4. Create the Lift-Top Mechanism: - Cut two pieces of wood for the sides of the lift-top mechanism. - Attach hinges to one side of each piece, ensuring they align properly. - Secure the other side of the hinges to the interior frame, creating a movable top. #### 5. Add the Table Top: - Position the table top on the lift-top mechanism, ensuring it fits properly. - Fix the table top to the mechanism using screws or nails. #### 6. Add Handles and Accessories: - Attach handles to the sides of the lift-top for easy lifting. - Consider adding additional features like a hidden storage compartment or cup holders. #### 7. Finishing Touches: - Sand the table's surface to smoothen any rough edges. - Apply wood stain or paint to achieve your desired color and finish. - Apply a protective sealant to protect the table from wear and tear. ### Conclusion Building your own lift-top coffee table is a rewarding project that can enhance both the functionality and aesthetics of your living space. By following this comprehensive guide, you can create a custom piece of furniture that meets your specific needs and preferences. Enjoy the satisfaction of crafting a beautiful and practical addition to your home while saving money and adding a unique touch to your living room.
Diy Lift Top Coffee Table Step By Instructions Chisel Fork

Diy Lift Top Coffee Table Step By Instructions Chisel Fork

Lift Top Coffee Table Ana White

How To Make A Coffee Table With Lift Top Plans Diy

Box Frame Coffee Table With Lift Top Ana White

Diy Lift Top Coffee Table Step By Instructions Chisel Fork

How To Build A Lift Top Coffee Table With Storage And Copper Pipe Base Crafted Work

Diy Lift Top Coffee Table Step By Instructions Chisel Fork Hinges

How To Build A Lift Top Coffee Table With Storage And Copper Pipe Base Crafted Work

Diy Lift Top Coffee Table Flips To Dining Not How Make